All kids love to play with balloons. Some like them at birthday parties some like them in bounce houses.
Nolie Scheid, 14 years old, from Eugene dreams of having his own balloon home. On a sunny day in Oregon he gathered the few materials needed; Vinyl, wood, tape, and set out to make his dream come true. With the help of his family Nolie cut out eighteen vinyl gores, that when placed intricately together, formed a dome shape. He then made a curved brace out of two by fours. Then taped each of the pieces together. Here is a photo of the last two pieces being taped together.
Here is a photo of the final product, blown up %90 of the way.
Nolie will combining this with another smaller balloon form to make his own thin shell dome home!
By: Herb Nordmeyer, author of The Stucco Book—The Basics
There are two general types of Insulated Concrete Forms (ICF), the forms that will burn readily and those that will not burn as readily. The latter are usually EPS beads encased in a cementitious paste. The former are EPS, XPS, or urethane that either consists of sheets that are connected to make block or have been formed by molding. Building codes require that the interior of a structure be protected from flammable walls. This can be done with 5/8″ of sheet rock, or it can be done with three-coat stucco or plaster. Most contractors use sheet rock.
The exterior of the ICF needs to be protected as well. While the ICF formed from a cement paste and EPS beads are more resistant to degradation from the elements than the EPS, XPS, or urethane ICF, they do degrade and need to be protected.
An EIFS-type coating adheres well on all ICF and is permanent, but it does not provide any fireproofing, so it should never be used inside a structure. Remember: Fire plus EPS equals very toxic fumes. It can, if the local code approves it, be used as an exterior coating if fire protection is not required or desired.
There are many one-coat stuccos that offer a one-hour fire rating, and some mistakenly use them to provide fireproofing to the ICF. The one-coat stuccos are systems, and they obtain the one-hour fire rating with an interior skin of 5/8″ sheet rock and nonflammable insulation between the studs. While one-coat stuccos are great products for other applications, this is not one of them.
Most building codes do not allow the direct application of stucco or plaster to EPS, XPS, or urethane. The reason for this is that if the surface of the insulating material has been exposed to the sun for 24 to 48 hours, the stucco or plaster does not bond as well, and a bond failure can occur at a later date. The low bond can be overcome by rasping the surface and applying stucco within a matter of hours. This method is not approved by any of the building codes so should not be used unless you want to get a professional engineer to sign off on the technique and then convince building officials that this is an acceptable method. Good luck if you want to try.
If you have an EPS, XPS, or urethane ICF, and you need a one-hour fire wall, you need to attach lath to the ICF and then apply stucco or plaster to the lath. Doing this, any good plaster or stucco formula will work.
If you insist on going against the building code and direct-applying stucco or plaster to EPS, XPS, or urethane, rasp the surface within a few hours of applying the stucco or plaster and add 1/2 gallon of exterior acrylic paint to each cubic foot of stucco concentrate you use. I prefer a stucco mix that consists of:
1 bag Portland,
1/3 bag of hydrated lime, and
4 cubic feet of stucco sand.
To get your paint, go to one of the big box stores and ask for paint that was tinted wrong or was returned. Ask for a deep discount. Remember, if you do this, your heirs may have a problem selling your house after you are gone.
If you are direct-applying stucco to the EPS bead/cement paste type of ICF, then the above formula, with or without the paint addition, will work.
Resource Box
Herb Nordmeyer, author of The Stucco Book—The Basics
By: Herb Nordmeyer, author of The Stucco Book—The Basics
We have all heard that mixing lime with Portland cement makes an excellent mortar or stucco, but which lime is best? In answering that question, we have identified the different products that are sold as lime and explained why they are appropriate or not appropriate.
Agricultural Lime is darker and courser.
Agricultural lime is calcium carbonate. That is ground limestone and for our purposes is of no value.
Quick lime is limestone that has been heated to about 1,6500 F to drive off the carbon dioxide. It is calcium oxide. When it comes into contact with water, it reacts to form calcium hydroxide. In the process, heat is given off, often enough to boil the water; and if the chucks of quick lime are fist-sized, they may explode. Quick lime can be used to make lime putty, but should never be considered as a component to be added to a mortar mixer.
Lime putty is quick lime that has been hydrated and has a toothpaste consistency. It can be made directly from quick lime, or it can be made by adding water to hydrated lime. It has a place in historic restoration and a few other places, but it is not worth the effort for most mortar and stucco work.
High-cal lime is a hydrated lime that is produced for water purification, wastewater treatment, and many other industrial processes. There are people, including some who should know better, who use it for making mortars and stuccos, but the quality testing is such that sometimes it has oversized (problems can be caused by particles that are less than 1/8″ in diameter) particles that can lead to lime-pops months after a job is complete. The oversized particles are calcium oxide particles, and it takes them a while to hydrate. When they do, the resulting calcium hydroxide takes up more space, so a bit of the mortar is broken off. Usually this results in a conical hole in the plaster or mortar with a white dot in the center. An additional problem with high-cal lime is that it is more prone to causing lime burns than Type S dolomitic hydrated lime.
Type N hydrated lime is very similar to the high-cal lime, but there are more quality checks, and the oversized particles that cause lime-pops are not present. With Type N hydrated lime, over 8% of the lime can be unhydrated. The unhydrated portion may be fine particles that fairly easily hydrate, or it can be hard-burned particles that are very difficult to hydrate. Hard-burned particles usually have a glassy layer around them that takes a long time for the water to penetrate and bring about the hydration process. Since there is unhydrated calcium oxide in the Type N hydrated lime, it can cause lime burns on skin.
Type S hydrated lime has less than 8% unhydrated particles. Much of the Type S is produced from dolomitic limestone (calcium-magnesium carbonate). Since magnesium oxide is harder to hydrate than calcium oxide, the hydration usually is done in a pressure hydrator. As a result, virtually all of the calcium oxide is hydrated, and the magnesium oxide which is not hydrated is less likely to cause skin burns than calcium oxide. Type S hydrated lime particles are usually larger than the Type N hydrated lime particles and give the resulting mortar or stucco more body and more workability. Where it is available, the Type S dolomitic hydrated lime is well worth the extra money it costs.
Resource Box
Herb Nordmeyer, author of The Stucco Book—The Basics
When last we left Andrew Bui, an engineer with Engineers Without Borders, he was in Guatemala trying to build a ferrocement water tank for the people of San Lorenzo. But they had run into some problems…
Ferrocement Water Tank Definition: a water containment structure built from a mixture of Portland cement and sand reinforced with layers of woven or expanded steel mesh, and closely spaced small-diameter steel rods (rebar) – source: Wikipedia.org Continue reading Ferrocement Water Tank
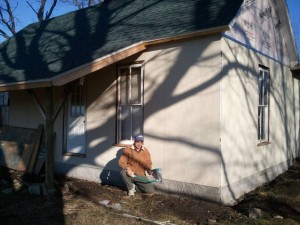
David Kottman of Roanoke, Mo. is no fool. Like many savvy shoppers, he clocks a lot of research hours before making any purchase. It’s the smart thing to do. So when looking for a solution to resurface the block wall foundation of an old homestead building on property he had purchased, he spent lots of time on the Internet, several hours of which were on MortarSprayer.com.
“I searched numerous websites to try and see what to do with this foundation,” David explains. “We wanted the solution for the foundation to be something we could do as a do-it-yourself project.”
An inexpensive solution was also important. The property on which the old house rests is something of an investment in the future. One day soon, David hopes the building will be surrounded by a thriving winery.
“Approximately eight acres came up for purchase at an estate sale,” David explains. “We purchased the property with the intention of creating a winery.”
In addition to the building with the ailing foundation, a 3,700-square-foot, 1890s era, three-room schoolhouse also rests on the property.
“We hope to renovate that structure, as well, to serve as the main building for the winery,” David says.
First things first. The first hurdle was the small out-building.
“This little building sits on the corner of the property,” David explains. “At one point, we thought we were going to fix it up and flip it, but then we decided not to do that.”
Since the building did once serve as a residence, David considered making it habitable to rent. But that plan was scrapped as well. It was decided the building would be incorporated into the winery, and while there are still no concrete plans for exactly what purpose it will serve, the building most definitely needs work. Regardless of its new role as a winery structure, the foundation of the building was in desperate need of a makeover, and other issues arose.
“The whole project involves a new roof, insulation, and new siding, as well as fixing up the foundation,” David explains. “This block foundation is under the oldest part of the house, under about two thirds of it.”
Like many of the old Missouri buildings built around the turn of the Century, the small structure is supported by a block foundation. Mortar used to set and finish blocks in the old days was not nearly as efficient as it today, and several patches of block on this home had to be reset and mortared before any resurfacing could be performed.
Using jacks, the house was lifted. Failed block was replaced, and all of the loose blocks re-mortared. David was ready to tackle the foundation.
Even after straightening and re-mortaring there was some surface unevenness, so David opted for a surface bond mix enriched with glass fibers, which he laid on pretty thick using a sprayer from MortarSprayer.com. With the help of a mixer mounted on the three-point hitch of a small tractor, he was easily able to complete mixing and be underway.
“We combined that mixture with a stone-veneer mix (Quikrete) that has high-adhesive qualities. We covered it with a pretty quick coating.”
Once that coat had set up, David came back over with another layer of stone-veneer mix combined with Quikrete sand topping mix. This succeeded in hiding any of the remaining glass fibers still sticking out.
The amazing part about all of this is that David did not have an adequately sized compressor to push the flow. What he did have was two smaller compressors for powering air tools. His solution was to tie the two compressors together.
“They had small tanks with fairly low CFM pumps,” David says. “We knew that we had to increase the rate of compression.” Having enough compressed air was also an issue. Tying the two pumps together using a couple of ten-gallon air pigs did the trick.
“The guy that was helping me with the project is a roofer by trade. He already had his compressor set up for the roofing nails, so we tied his compressor in with mine.”
The two compressors were run through one manifold which fed the sprayer.
Since David had never sprayed plaster before, there was a learning curve involved. But it didn’t take him long to catch on.
“It took some time, but we eventually had a good feel for how to keep the tool moving, when to pull the trigger, etc.”
His mix kept leaning toward the dry side, so it also took a little playing to get the right consistency. “When we had fingers of mix coming out of the holes that didn’t drip on the ground, that was what worked best.” From start to finish, the entire job only took about two hours.
MortarSprayer, compressors, and hoses. Aside from the pump and stucco, these were everything David needed.
All in all, David was pleasantly surprised with the results. “I thought it was going to be a dull, concrete gray, but it dried up a little whiter than I expected and looks real nice.”
David says he doesn’t know how he would have completed the job without the sprayer, and he was quick to justify his purchase.
“There’s going to be some foundation work on the schoolhouse, too,” David adds. “This will work well for matching the original foundation.”
David says that since he’s completed this project, he has all kinds of additional potential projects floating around in his mind, such as stucco siding on some buildings, and even a compost containment bin.
“I don’t know which of these projects will happen, but it’s certainly opened our eyes to a whole wide range of potential projects. It’s just a new method of construction that we hadn’t considered possible before.”
In the meantime, the foundation of the house is complete. And while the grapes mature, David has his eye set on the schoolhouse.
The Decorative Concrete Decision When real estate was booming, all was well in the Battles household. But having two breadwinners in the same industry can sometimes backfire. In the case of Dion Battles, it hit home in a big way.
“Both my wife and I were in real estate,” Dion says. “Then the industry tanked. It came time for me to go out and get a job paying eight-dollars an hour or branch out into something new.”
With a prior background in construction, as well as airbrush work in the automobile industry, Dion felt it was time to make a positive change. It was time for something new.
“I’ve always kind of been an artist,” Dion says. “So we looked at our market, saw what we did not have, and decided to dive into it.”


 Lime putty is quick lime that has been hydrated and has a toothpaste consistency. It can be made directly from quick lime, or it can be made by adding water to hydrated lime. It has a place in historic restoration and a few other places, but it is not worth the effort for most mortar and stucco work.
 High-cal lime is a hydrated lime that is produced for water purification, wastewater treatment, and many other industrial processes. There are people, including some who should know better, who use it for making mortars and stuccos, but the quality testing is such that sometimes it has oversized (problems can be caused by particles that are less than 1/8″ in diameter) particles that can lead to lime-pops months after a job is complete. The oversized particles are calcium oxide particles, and it takes them a while to hydrate. When they do, the resulting calcium hydroxide takes up more space, so a bit of the mortar is broken off. Usually this results in a conical hole in the plaster or mortar with a white dot in the center. An additional problem with high-cal lime is that it is more prone to causing lime burns than Type S dolomitic hydrated lime.
 Type N hydrated lime is very similar to the high-cal lime, but there are more quality checks, and the oversized particles that cause lime-pops are not present. With Type N hydrated lime, over 8% of the lime can be unhydrated. The unhydrated portion may be fine particles that fairly easily hydrate, or it can be hard-burned particles that are very difficult to hydrate. Hard-burned particles usually have a glassy layer around them that takes a long time for the water to penetrate and bring about the hydration process. Since there is unhydrated calcium oxide in the Type N hydrated lime, it can cause lime burns on skin.
 Type S hydrated lime has less than 8% unhydrated particles. Much of the Type S is produced from dolomitic limestone (calcium-magnesium carbonate). Since magnesium oxide is harder to hydrate than calcium oxide, the hydration usually is done in a pressure hydrator. As a result, virtually all of the calcium oxide is hydrated, and the magnesium oxide which is not hydrated is less likely to cause skin burns than calcium oxide. Type S hydrated lime particles are usually larger than the Type N hydrated lime particles and give the resulting mortar or stucco more body and more workability. Where it is available, the Type S dolomitic hydrated lime is well worth the extra money it costs.


 David Kottman of Roanoke, Mo. is no fool. Like many savvy shoppers, he clocks a lot of research hours before making any purchase. It’s the smart thing to do. So when looking for a solution to resurface the block wall foundation of an old homestead building on property he had purchased, he spent lots of time on the Internet, several hours of which were on MortarSprayer.com.